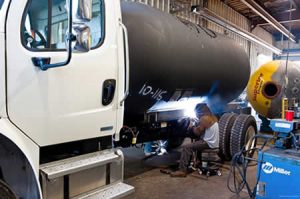
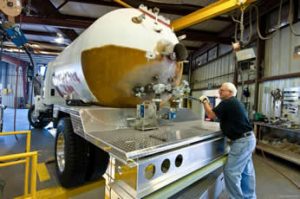
The tank has been fitted to the new chassis and is ready for the skirting department.
The skirting department uses specifications by the customer for installation. Skirting can be an open or closed compartment and made of aluminum, steel, stainless, or polished steel. It also includes light brackets and a bumper required by the D.O.T. (Department of Transportation). The skirting department also drills and cuts all openings for wire and pipe routing (and any other opening which might be required).
 Listed below you’ll find brief descriptions of the three propane truck deck styles offered by BT&T. All of them (with the exception of the closed compartment deck) are available in steel, stainless steel or aluminum. The closed compartment deck is available only in steel or stainless steel, because of the necessity of welding it to the vessel.
Rear-Closed Compartment Deck
Twenty-five percent of our decks are enclosed cabinets with spring-loaded overhead doors. These are typically located either on the side or back of the propane truck. The majority of our enclosed units are sold in the northern US. Three sixteen-inch aluminum doors are used on all closed compartment decks, because they’re light weight. One quarter-inch material is used in the deck’s sub frame. This deck is continuously welded to the vessel inside and out and to the deck’s sub frame. This unit can be removed from the chassis with all of the plumbing, wiring and equipment intact. We have been building this deck for about 30 years and have never had a failure, except for a broken turnbuckle. Since then we have switched to a heaver stainless steel turnbuckle and have had no problems. The entire door is spring-loaded and will open or close with little effort. When open, the door is high enough to shield the driver in inclement weather. All of our closed decks have drain openings for washing and cleaning.
Decks with Integrated Fenders
This style of deck accounts for 70 percent of our sales. Experience over the years has taught us that the high fenders suffer very little damage in the field, except during a rollover (and if that happens the fender is the least of your problems). The high fender allows much easier access to the tires for observation and installation of snow chains. We have also learned that the high, integrated fenders do a much better job of keeping road debris off the deck and equipment. This deck can be removed from the chassis with all of the equipment in tack. The deck and fenders are supported by bolts to the truck frame. This deck, like all of our decks, allows all of the deck plumbing to move with the chassis frame. The exception is the meter and hose reel which have flex hoses. This relieves the meter and reel of any stress from frame movement.
Decks with Separate Fenders
This deck style accounts for about 5 percent of our sales. It is built similarly to the integrated deck, except for the curve fenders that are usually bolted to the vessel’s frame rails. Most of these buyers want the separated fenders for easy replacement in case of fender damage. As mentioned above, we find more damage with this type of fender than with the integrated ones. We’ve also found that it’s hard to buy a curve fender with the exact same radius even when buying from the same manufacture. It is not our intent to recommend a style of deck to our customers, but only to make them aware of what we have experienced.
Completing Skirting Installation
After completion the truck is moved to the plumbing and wiring department, which also includes pre-electronic wiring.
Skirting Slideshow

 Every unit that BT&T refurbishes goes though a standard process regardless of size or age. This process begins by checking the data plate to assure the vessel complies with all applicable codes. The vessel is then evacuated of all combustible materials and tested by two individuals to verify that it’s safe to remove from the old chassis. All skirting is removed along with the main valve, pump and pump studs.
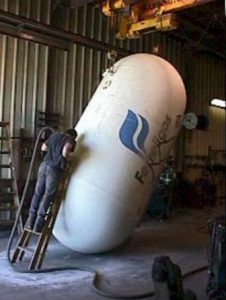 After the tank has been removed from the old chassis and the refurbishment process has begun, the vessel is then moved to the tank shop where the manway cover, float gauge and all tank fittings are removed. The float gauge is examined, and if no defects are found, is marked and sent to the plumbing stall. Qualified technicians check for defects in the vessel’s interior, such as broken baffles and internal plumbing. If any debris is found in the tank it’s vacuumed out. The exterior of the tank is checked to see if any damage was exposed during the exploratory blasting. If any defects are found, they are evaluated and all necessary repairs are made. If the tank is not equipped with a manway, the interior of the tank is inspected with mirrors and lights for any defects and debris. The tank is then stood on its end and a special vibrator is bolted to the pump flange. The entire tank is vibrated for a few minutes to remove any debris which might be attached to the interior of the vessel. This debris is removed by vacuuming through the float gauge and pump flange while it is still on its end.
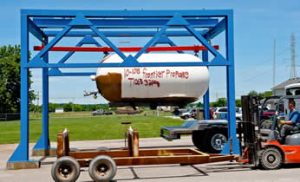
 Once the tank has been removed from the old chassis and the refurbishing processes are underway, the tank is placed on a new chassis that has been pre-drilled and fitted with the proper hold-down brackets. The fitted brackets are welded to the vessel’s rails. If new rails are required, they’re installed on the chassis frame first, and then the tank is placed into the rails and welded to the tank pads. Fitting the rails to the tank prevents “cantilevering” the chassis, which creates uneven weight distribution. After the mounting process is completed the vessel is moved to the skirting department.
 Listed below you’ll find brief descriptions of the three propane truck deck styles offered by BT&T. All of them (with the exception of the closed compartment deck) are available in steel, stainless steel or aluminum. The closed compartment deck is available only in steel or stainless steel, because of the necessity of welding it to the vessel.
 The plumbing technician removes all plugs and piping from the vessel that was used during the hydro pressure testing. BT&T discards all old plumbing, including back checks, excess flow valves, globe valves, ball valves, relief valves, etc. Only three items are rebuilt on a BT&T refurbished unit – the meter, main valve and pump. Experience has shown that it’s cheaper and quicker to use new parts versus rebuilding. For example, to properly rebuild a globe valve it needs to be stripped of all of the old plumbing, completely dissembled, cabinet blasted and all threads chased. When you add labor plus parts, it’s much cheaper to install a new globe valve.


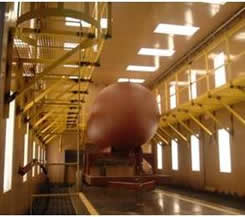 When their work is completed the Plumbing Department uses a special overhead lift to remove the unit from the chassis and place it on a special cart for blasting and painting. When blasting is completed, the unit and all its plumbing are sprayed with a coat of etching primer followed by a coat of sanding primer. The unit is then hand sanded and coated with sealing primer, and then moved into our heated paint booth where it receives two coats of DuPont’s Imron paint. All removable plumbing and parts are hung from spraying racks for painting. The chassis frame is hand sanded and a new coat of paint is sprayed on the interior and exterior of the chassis rails. Once the unit is fully painted, it moves to the Final Assembly team.
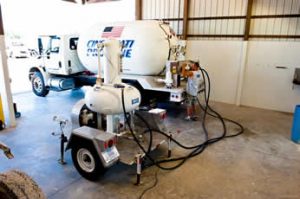 The unit is moved into the final assembly stall where it’s completed. The lights are fastened to the pre-installed brackets and all wiring is attached to special stainless steel stud-welded bolts. When the wiring is completed and tested, plumbing is installed back into the system, including the new/rebuilt meter and new hose reel. The electronics are installed in the cab, and fluid levels and tire pressure are checked.